Pages

Saturday, April 30, 2011

Ladybug Template PU/CU

I just made this cute little ladybug template that you may use for personal or commercial use :)  The actual size is 1099 x 742 and comes in PSP and PSD formats.  Included in the file is the template with separate layers and my example.

Enjoy!  :)


Download the PSP format HERE
Download the PSD format HERE

Saturday, April 23, 2011

Star Sparkles Tube Tutorial

I know there are other tutorials out there that teach you how to make your own star sparkles, and I also know that you can easily add sparkles using the Alien Skin Xenofex 2 Constellation filter.  In fact this tutorial uses that filter to make your tube lol!  This is just another way to make your own star sparkles tube.


This tutorial was written using PSP9, but is compatible with other versions.

You will need Alien Skin Xenofex 2, which you can download from here.

Open a new transparent image, 100 x 100.
Flood fill with black so we can see what we're doing.
Add a new raster layer.
Get your paintbrush tool with these settings:


Paint a few specks on your canvas:


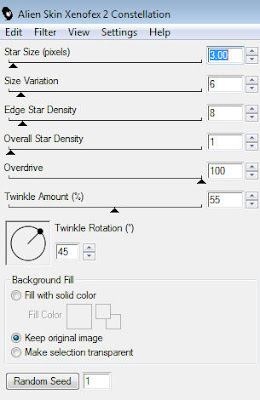
Go to Effects>Plugins>Alien Skin Xenofex 2>Constellation and use these settings:
Now we will begin making our tube from these sparkles.

Open a new transparent image, 50 x 50 and fill with black.
Go back to your canvas with the sparkles and using your rectangle selection tool, select one of your stars.  Copy and paste as new layer on the new image you just made.  Go back to your sparkle image and select a few more stars, trying to get different sizes.
Line them up on your new canvas like so:


Try to line them up and space them somewhat evenly.
When you have them as you like them, go to File>Export>Picture Tube and enter your settings. Here are mine (yours may differ, depending on how many stars you have):


Now let's test out our new tube!
Open a new transparent image, 600 x 600 and flood fill with black or another colour of your choice.
Add a new layer.  Use your picture tube tool and navigate to the star sparkles tube you just made.  
Click randomly on your canvas, or you can just hold down your mouse and drag it around on your canvas.


To make coloured star sparkles, read on!

On your 50 x 50 canvas, add a new layer on top.
Add your colour of choice for your foreground and another colour for your background.  Set your foreground to Gradient with these settings:


(Or you can just use a solid colour).
Flood fill your new layer.
Highlight your star sparkles layer and go to Selections>Select All>Float.  Selections>Defloat.  Selections>Invert.
Now highlight your gradient/color-filled layer and hit delete on your keyboard.
Merge down with your star sparkles layer and if you haven't already deleted the black background layer, delete it, too.
Export as above, but add the colour in your tube name.


Another method to add colour, if you want to leave your star sparkles white, is when you are using your star sparkles tube, just follow the above instructions to add the colour.
I hope you've enjoyed this tutorial!

Friday, April 22, 2011

Water Texture Action

Enjoy this action I created to make a water texture.  The ending size is 400 x 400 pixels.  PU/CU


Download the action HERE

ColorPOP Action and Scipt

Here is an action and script I made from finding a tutorial online to make the colors of your image more vibrant. It's very simple and fast, but the effects are very nice!  The action was created using PS3, and the script was created using PSP9, but both are surely compatible with other versions of the programs.(PSP users - place the script in your Restricted Scripts folder).

For Personal or Commercial use!

Click on each image to get a bigger view.

Download the PS Action HERE
Download the PSP Script HERE

Birthday Mini Kit Freebie

Here is something I made a little while back and never got around to sharing, so thought I would now.  :)  This is a tagger's size kit and is for personal use only.  Each element is on its own layer.  I have saved this kit in psd and psp formats.


Included in this mini kit is:
Birthday cake
Happy Birthday text
Birthday hat
2 Confetti layers
Balloon
Candle

Download the psp format HERE
Download the psd format HERE

Tuesday, April 12, 2011

In the process....

I will be in the process of moving some of my older tutorials over from my google site (PSP Realm ).I am still going to keep the google site up but I eventually hope to just move everything over here to my blog (the less I have to keep up with, the better lol!).  I'm still getting used to the whole blog thing, and I could never quite customize the google site like I wanted, soooooo please bear with me :)

Saturday, April 9, 2011

Kinky Angel Scrapkit, a PPC Exclusive!

Well I have FINALLY finished the scrapkit to go with PPC's exclusive Lady Mishka tube!  To get the kit, simply join the forum at PSP-Party Central.  :)

The kit includes:

17 papers (800x800)
2 frames
3 bows
4 butterflies
1 lips
2 sequin backgrounds
1 wordart (5 colours)
4 brads
1 Kinky Angel charm
1 heart charm
1 handcuffs
2 mesh backgrounds
2 locks
2 jeweled hearts
2 flowers
1 feather
1 hanging pendant
4 stiletto heels
1 kinky angel ribbon
3 ringed ribbons
1 angel silhouette


New scrapkit on the way!

For the past few days I have been working on a scrapkit for the exclusive Kinky Angel tube for the PPC forum.  I'll post it as soon as I'm finished, which hopefully will be this weekend.  :)

Sunday, April 3, 2011

Kinky Angel Forum Set

Kinky Angel Forum Set

This tutorial was written using PSP9 but is compatible with other versions.
It was also written for those who have a working knowledge of PSP.

Plugins needed:
AAA Frames
Alien Skin Xenofex 2 (Constellation) (this is not a free plugin)
Xero (Porcelain)
Font of choice (I am using BankGothic Md BT, which comes with Windows)
Tube of Choice: I am using the awesome work of Lady Mishka. This piece was commissioned for the PSP Party Central forum so you cannot purchase it, but you can check out and purchase her other great stuff at PSPTubesEmporium. If you would like a chance to earn this exclusive tube, join me over at PPC and tell them Shazza sent you! :)

Let's get started!

Open your tube in PSP.
Open a transparent image, 600 x 200.
Selections/Select All.
Flood with colour from your tube (I used #8440ad)
Effects/Plugins/Alien Skin Xenofex/Constellation:

Adust/Blur/Gaussian blur: 0.5.
Effects/Illumination effects/Sunburst:


Duplicate. Effects/Plugins/AAA Frames/Foto Frame:


Use your rectangle selection tool and make a selection around the foto frame:


Selections/Invert. Hit delete. Merge down. Ctrl+D.
Copy your tube and paste as a new layer. Place her to the right of your canvas. Duplicate. Change the blend mode to the top tube layer to Soft light.
Effects/Plugins/Xero/Porcelain:


Hide background layer and merge visible.
Unhide background layer. Duplicate. Image/Mirror. Resize to 135% (size may vary depending on your tube) and position her.
Adjust/Sharpness/Sharpen. Duplicate. Change blend mode on top layer to Soft light.
Hide all layers except for your top two tube layers and merge visible. Unhide all layers.
Add drop shadows to tubes:


Highlight your bottom layer.
Use your rectangle selection tool again and draw out a rectangle the size of the inside frame box as before.
Selections/Invert. Highlight your tube layers and delete. Ctrl+D.
Get your rectangle preset tool, width set to 1.
Set foreground to black, background to null.
Draw out a narrow rectangle the length of your canvas, approx. 590x175.
Convert to raster.
Get your eyedropper tool and right click for dark background colour (I used#8726b0) and left click for a light colour from your tube (I used#a675c5).
Set foreground to foreground-background gradient:


Flood fill your rectangle.
Add your name. Merge down with your rectangle layer.
Drag this layer between your two tube layers.
Add copyright info and save.


AVATAR:


Open up transparent image, 125 x 125.
Copy the background layer from your main image and copy as new layer on the avatar canvas. Move until it's where you like it and Merge all (flatten).
Effects/Plugins/AAA Frames/Foto Frame with the same settings as before.
Go back to main image and copy the tube on the right, and paste as new layer on your avatar image and mirror.
Resize 90%. Position her where you like and hide the layer.
Highlight bottom layer.
Use your rectangle selection tool and draw a selection around the foto frame border as above. Selections/Invert.
Highlight your tube layer and hit delete. Ctrl+D.
Unhide your tube layer. Add your name and your copyright and you're done :)


Here I am again!

Man oh man it's been such a long time since I've been back on my blog! Time really does have a way of slipping by so quickly and there's just not enough hours in the day to do everything that I want to do. I would like to get back to my creative side (what little creativity I have lol). I did manage to write a tut - my first one in over a year lol. I haven't posted any of my tuts to my blog yet, as I have them on a google site so the one I just wrote will be the first one I've put up on a blog, which should be an experience lol. Let me know if you noticed something that needs to be changed. I'm always open to suggestions and improvements :)

Hugs!