
Kinky Angel Forum Set


This tutorial was written using PSP9 but is compatible with other versions.
It was also written for those who have a working knowledge of PSP.
It was also written for those who have a working knowledge of PSP.
Plugins needed:
AAA Frames
Alien Skin Xenofex 2 (Constellation) (this is not a free plugin)
Xero (Porcelain)
Font of choice (I am using BankGothic Md BT, which comes with Windows)
Tube of Choice: I am using the awesome work of Lady Mishka. This piece was commissioned for the PSP Party Central forum so you cannot purchase it, but you can check out and purchase her other great stuff at PSPTubesEmporium. If you would like a chance to earn this exclusive tube, join me over at PPC and tell them Shazza sent you! :)
Let's get started!
Open your tube in PSP.
Open a transparent image, 600 x 200.
Selections/Select All.
Flood with colour from your tube (I used #8440ad)
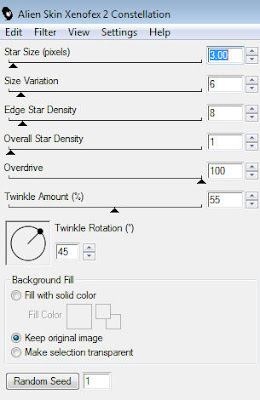
Effects/Plugins/Alien Skin Xenofex/Constellation:
 Adust/Blur/Gaussian blur: 0.5.
Effects/Illumination effects/Sunburst:
AAA Frames
Alien Skin Xenofex 2 (Constellation) (this is not a free plugin)
Xero (Porcelain)
Font of choice (I am using BankGothic Md BT, which comes with Windows)
Tube of Choice: I am using the awesome work of Lady Mishka. This piece was commissioned for the PSP Party Central forum so you cannot purchase it, but you can check out and purchase her other great stuff at PSPTubesEmporium. If you would like a chance to earn this exclusive tube, join me over at PPC and tell them Shazza sent you! :)
Let's get started!
Open your tube in PSP.
Open a transparent image, 600 x 200.
Selections/Select All.
Flood with colour from your tube (I used #8440ad)
Effects/Plugins/Alien Skin Xenofex/Constellation:
 Adust/Blur/Gaussian blur: 0.5.
Effects/Illumination effects/Sunburst:

Duplicate. Effects/Plugins/AAA Frames/Foto Frame:

Use your rectangle selection tool and make a selection around the foto frame:

Selections/Invert. Hit delete. Merge down. Ctrl+D.
Copy your tube and paste as a new layer. Place her to the right of your canvas. Duplicate. Change the blend mode to the top tube layer to Soft light.
Effects/Plugins/Xero/Porcelain:
Copy your tube and paste as a new layer. Place her to the right of your canvas. Duplicate. Change the blend mode to the top tube layer to Soft light.
Effects/Plugins/Xero/Porcelain:

Hide background layer and merge visible.
Unhide background layer. Duplicate. Image/Mirror. Resize to 135% (size may vary depending on your tube) and position her.
Adjust/Sharpness/Sharpen. Duplicate. Change blend mode on top layer to Soft light.
Hide all layers except for your top two tube layers and merge visible. Unhide all layers.
Add drop shadows to tubes:

Highlight your bottom layer.
Use your rectangle selection tool again and draw out a rectangle the size of the inside frame box as before.
Selections/Invert. Highlight your tube layers and delete. Ctrl+D.
Get your rectangle preset tool, width set to 1.
Set foreground to black, background to null.
Draw out a narrow rectangle the length of your canvas, approx. 590x175.
Convert to raster.
Get your eyedropper tool and right click for dark background colour (I used#8726b0) and left click for a light colour from your tube (I used#a675c5).
Set foreground to foreground-background gradient:

Flood fill your rectangle.
Add your name. Merge down with your rectangle layer.
Drag this layer between your two tube layers.
Add copyright info and save.
Add your name. Merge down with your rectangle layer.
Drag this layer between your two tube layers.
Add copyright info and save.
AVATAR:
Open up transparent image, 125 x 125.
Copy the background layer from your main image and copy as new layer on the avatar canvas. Move until it's where you like it and Merge all (flatten).
Effects/Plugins/AAA Frames/Foto Frame with the same settings as before.
Go back to main image and copy the tube on the right, and paste as new layer on your avatar image and mirror.
Resize 90%. Position her where you like and hide the layer.
Highlight bottom layer.
Use your rectangle selection tool and draw a selection around the foto frame border as above. Selections/Invert.
Highlight your tube layer and hit delete. Ctrl+D.
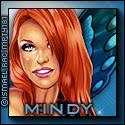
Unhide your tube layer. Add your name and your copyright and you're done :)

Copy the background layer from your main image and copy as new layer on the avatar canvas. Move until it's where you like it and Merge all (flatten).
Effects/Plugins/AAA Frames/Foto Frame with the same settings as before.
Go back to main image and copy the tube on the right, and paste as new layer on your avatar image and mirror.
Resize 90%. Position her where you like and hide the layer.
Highlight bottom layer.
Use your rectangle selection tool and draw a selection around the foto frame border as above. Selections/Invert.
Highlight your tube layer and hit delete. Ctrl+D.
Unhide your tube layer. Add your name and your copyright and you're done :)


No comments:
Post a Comment